• Entertaining
    • Tablescapes
    • Birthdays
    • Kids’ Parties
    • Bridal Showers
    • Holidays
  • DIY
    • Free Printables
    • Party Crafts
    • Party Treats
    • Gifts
  • Food & Drink
    • Drinks & Cocktails
    • Appetizers & Salads
    • Party Snacks
    • Sweet Treats
    • Holidays
  • Shop
    • Tabletop
      • Paper Plates
      • Paper Cups
    • Birthday Parties
      • Trending in Birthdays!
      • Boy Birthday Party Invitations
      • Grown Up Party Invitations
      • Grown Up Birthday Parties
      • Boy Birthday Party Packages
      • Gender Neutral Birthday Parties
      • Girl Birthday Party Invitations
      • Girl Birthday Party Packages
    • Bridal
      • Bridal Shower & Rehearsal Dinnner
    • Baby
      • Baby Showers & Gender Reveals
      • Confirmation & First Communion
      • Baptism
    • Holidays
      • Anniversaries
      • 4th of July & Patriotic Parties
      • Graduation
      • Halloween
      • St Patrick’s Day & Easter
      • Valentine’s Day
      • End of School Year & Back to School
      • Mardi Gras
  • About Us
  • Press
  • Contact

Crowning Details

Party Inspiration for all occasions!

  • Entertaining
    • Tablescapes
    • Birthdays
    • Kids’ Parties
    • Bridal Showers
    • Holidays
  • DIY
    • Free Printables
    • Party Crafts
    • Party Treats
    • Gifts
  • Food & Drink
    • Drinks & Cocktails
    • Appetizers & Salads
    • Party Snacks
    • Sweet Treats
    • Holidays
  • Shop
    • Tabletop
      • Paper Plates
      • Paper Cups
    • Birthday Parties
      • Trending in Birthdays!
      • Boy Birthday Party Invitations
      • Grown Up Party Invitations
      • Grown Up Birthday Parties
      • Boy Birthday Party Packages
      • Gender Neutral Birthday Parties
      • Girl Birthday Party Invitations
      • Girl Birthday Party Packages
    • Bridal
      • Bridal Shower & Rehearsal Dinnner
    • Baby
      • Baby Showers & Gender Reveals
      • Confirmation & First Communion
      • Baptism
    • Holidays
      • Anniversaries
      • 4th of July & Patriotic Parties
      • Graduation
      • Halloween
      • St Patrick’s Day & Easter
      • Valentine’s Day
      • End of School Year & Back to School
      • Mardi Gras
  • About Us
  • Press
  • Contact

DIY Party Crafts

How to Make Paper Mache Valentine Trees

This post was sponsored by PrintWorks. All ideas and opinions are my own.

In this post, you will learn how to create your own paper mache trees covered in Valentine’s Day paper hearts. Keep scrolling for more photo inspiration and a quick how-to.

Valentine paper mache trees

If you are like me, you have a craft room full of supplies from various holidays. To make the best use of supplies, I often look for creative re-purposing ideas for upcoming holidays. One of my favorite home decor items found throughout the Christmas season are cone trees adorned with a variety of textures, materials and colors. They make great home decor groupings and are perfect for holiday centerpieces.

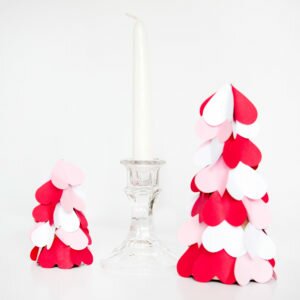
This year, I decided to create some Valentine heart trees inspired by these, using paper hearts as the tree’s texture. With just 4 supplies and a few minutes, you can re-create these DIY Valentine trees at home. Keep scrolling for more photo inspiration and the simple how-to tutorial.

DIY valentine trees

DIY valentine trees

Paper Mache Valentine Trees

Supplies Needed

  • Red, Pink & White Card Stock from PrintWorks
  • Hot Glue
  • Paper Mache Cones in a Variety of Sizes (i.e. 6 inch, 8 inch and 11 inch heights)
  • Heart Shaped Craft Punches (1-3″ in size)

valentine tree supplies needed

Instructions

  1. Using red, white and pink card stock from PrintWorks and a heart shaped craft punch, punch heart shapes. If you are using a variety of paper mache cone sizes, choose heart shapes that pair well. For example, smaller paper mache cones work best with 1-1 1/2 inch heart shapes, while larger 10+ inch paper mache cones pair best with heart shapes 2″ and larger.
  2. Using a hot glue gun, begin attaching the paper hearts from the base of the paper mache cone, alternating card stock colors. Complete a full row of hearts before moving onto the next row.

valentine tree DIY

3. As you work your way up the paper mache cone attaching hearts, bend the paper heart edges inward slightly to create a 3-dimensional appearance.

paper heart valentine tree

4. Once you have completed your paper mache cones, arrange them either as a home decor display, or as a table centerpiece. Groupings using odd numbers are most visually appealing (i.e. 3, 5, 7, 9).

To add dimension to your display, consider using clear candlesticks as a “tree base” for some of your Valentine trees. To stabilize the paper trees on the candlesticks, use white taper candles underneath.

To purchase the PrintWorks card stock used for this Valentine Tree DIY, head over to Amazon.

And, for more DIY paper inspiration, don’t miss the following posts:

How to Make Paper Poinsettia Napkin Rings

How to Create a Paper Cactus Centerpiece

DIY valentine tree

DIY valentine trees

Share this:

  • Tweet


Leave a Comment

« 4 Simple and Delicious Football Party Snacks
How to Make Spicy Trail Mix »

Leave a Reply Cancel reply

Your email address will not be published. Required fields are marked *


OUR PARTNER

bstcasinos

Don't miss out on an incredible opportunity to enhance your gaming experience—claim your no deposit bonus today.

Categories

  • Appetizers & Salads
  • Birthdays
  • Bridal Showers
  • DIY
  • Drinks & Cocktails
  • Entertaining
  • Food & Drink
  • Free Printables
  • Gifts
  • Holidays
  • Holidays
  • Kids' Parties
  • Party Crafts
  • Party Snacks
  • Party Treats
  • Sweet Treats
  • Tablescapes
  • Uncategorized
  • Blog
  • Entertaining
    • Tablescapes
    • Bridal Showers
    • Holidays
  • Shop
  • About Us
  • Press
  • Terms & Conditions
  • Contact

Copyright © 2024 · Divine theme by Restored 316