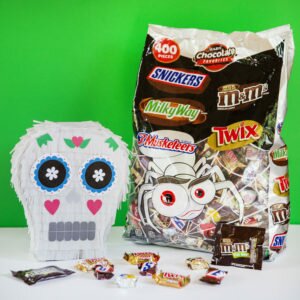
This shop has been compensated by Collective Bias, Inc. and its advertiser, Mars Wrigley Confectionery US, LLC. All opinions are mine alone. #HalloweenSugarSkullPinata #FlauntYourHaunt #CollectiveBias
Learn how to DIY your own sugar skull pinata in this post. Keep scrolling for more photo inspiration and the simple DIY pinata tutorial.

After school officially starts, it’s time to celebrate Halloween, am I right!?! While Halloween itself is just a single day, celebrations occur throughout the entire month of October. We will be sharing tons of simple DIY project ideas, plus some Halloween party inspiration to help you prepare. Today, we are sharing this DIY Sugar Skull pinata, filled to the brim with Mars Chocolate Favorites that we picked up at our local Walmart. Keep reading for the simple how-to (really, it’s simple), plus our FREE printable sugar skull imagery needed to complete this fun DIY Halloween project.


DIY Sugar Skull Pinata
I am SO excited for you to learn how to make this DIY sugar skull pinata. While it may seem challenging at first glance, the process is really quite simple. Keep reading for the full how-to.

Supplies Needed
- (3) 12×12 sheets of thin, corrugated cardboard
- Craft Knife
- Masking Tape
- 1-2 Rolls of Crepe Paper (we used white)
- Fringe Scissors (or regular scissors)
- Sugar Skull Printable (See below)
- 1 Bag of Mars Chocolate Favorites

Step 1: Trace your desired shape onto two pieces of thin cardboard using a pen or pencil. Using a craft knife, carefully cut out two identical sugar skull shapes.
Step 2: Cut 2-2.5 inch strips of cardboard using scissors, over the entire length of your 12×12 piece of cardboard (tip: I prefer to use the leftover side portions of the cut cardboard from Step 1 to reduce waste). For this step, corrugated cardboard is key as you will be using these pieces to form the side shapes of your sugar skull pinata. To expose the corrugated portion of the cardboard strips, simply peel the outside layer of paper on your piece of cardboard.

Step 3: Using 2-2.5 inch pieces of masking tape, begin to attach your front, back and side pieces of cardboard together. Space your pieces of masking tape approximately .5 inches apart for the best hold. Before moving onto the next step of adding fringe, be sure to cut a small trap door in the base of your pinata so that you can fill it with Mars Chocolate Favorites.

Step 4: Once you have finished securing your overall pinata shape, you can begin adding fringe. A shortcut that we love to use when creating fringe of any kind are these amazing scissors that cut multiple strips with each cut. However, you can achieve the same look using more cuts with a standard pair of scissors. Working one strip at a time, begin adhering strips beginning at the base, using clear glue. Work your way up to the top, then the sides, and the back of your pinata in the same fashion.

Step 5: Print your FREE Sugar Skull printables found below, then trim each shape using scissors. Adhere the decorative shapes onto the front of your pinata using the same clear glue used in the previous step.

Step 6: Now that your Sugar Skull pinata has been fully assembled, you are ready to fill it with treats!! Our Day of the Dead inspired pinata was filled to the brim with Mars Chocolate Favorites. You can pick up a bag of this chocolate deliciousness at your local Walmart in the seasonal aisles. Once you have filled your pinata using the tram door, simply secure it shut using clear tape. Now, your DIY pinata is ready to Halloween party!
Download your FREE Sugar Skull Printable:
Click on the image below to shop these great products.


Leave a Reply